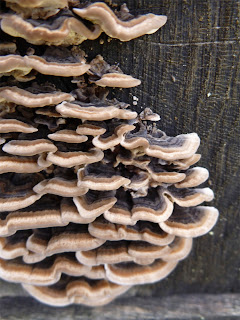
I'll start and end with the fungi. Yesterday I had a little time to myself and I used it to do a bit of testing. My veggie garden has four very large raised beds that are constructed out of untreated oak railroad ties. Several kinds of bracket fungi have made themselves quite comfortable on the old oak ties. There is one color of trametes versicolor that I've been looking for and I finally found some. It's the blueish tinted variety. Trametes versicolor can vary a lot. According to the book "The Rainbow Beneath my Feet", by Arleen Rainis Bessette and Alan Bessette, the blue variety makes a blue or green dye.
 |
| Trametes versicolor |
I also found a bit of "Tripe fungus" or Auricularia mesenterica. I thought I'd go ahead and test this as well.
 |
| Auricularia mesenterica |
 |
| The underside of Trametes versicolor is always white |
 |
| The two test baths |
Both of the samples were mordanted with alum. Unfortunately, there was almost no color produced by the fungi. I'm wondering if my trametes versicolor isn't the right blue. I've let the two tests sit in the bath overnight and will reheat them today.
Now, on to the lichens. I live in a place that is fortunate enough to have a wealth of lichens. Some lichens produce an acid called orchil. These lichens, if fermented in an ammonia solution, can produce pinks, reds, purples and blues. When I first started testing lichens I dried and crushed them, put them in glass jars and tried to ferment them in order to see if they contained any orchil, but there is an easier way.
 |
Melanelixia subargentifera -scraped area at center of photo
|
It's called the bleach test. All you need is a very small container of bleach, a couple of q-tips and a small knife. You test the lichen in question by gently scraping off the upper colored surface, revealing the white layer below, then you dab on a bit of bleach and wait to see if it turns red. The reaction should be instant.
 |
| Melanelixia subargentifera - red reaction from bleach at center of photo |
|
|
 |
Punctelia subrudecta - red reaction at center of photo
|
I have tried this on many lichens and only found a few that reacted positively. One note here, for whatever reason, I haven't been able to get xanthoria parietina to react even though it does contain orchil acid. I'm not sure why this is, but maybe it has to do with the fact that the color from paramelia saxatilis is photo sensitive and turns blue when exposed to sunlight or maybe it's just a matter of the concentration of orchil acid.
The two lichens that tested positive yesterday were Melanelixia subargentifera and Punctelia subrudecta. I recommend collecting lichens that have been growing in full sunlight as this seems to cause them to produce stronger dyes. Collecting lichens is always easier just after a good rain and I find it's easier to collect them from smooth barked trees such as plum trees, figs, blackthorns etc. Always remember not to take more than ten percent of the lichen present and be 100% sure that you know what you're collecting. Lichens are very slow growing. Some of them are very rare.
 |
| Left to Right: Punctelia subrudecta and Melanelixia subargentifera | |
Fortunately, it doesn't take a lot of lichen for the ammonia fermentation method. You crush up anywhere from 1/4 cup to 1 cup of the dried lichen and place it in the bottom of a glass jar with a tight fitting lid. The amount of lichen depends on the amount of fiber you want to dye. Make sure that the jar can hold twice the volume of lichen that you are using. Then you fill the jar to 1/3 full with household ammonia and top off the remaning 2/3 with water. You can use a 1:1 solution of water to ammonia, but I prefer to use less ammonia. You could also use old urine. In that case, don't add any water.
After sealing the jar tightly you shake the mixture as many times as you can remember per day for at least one month. It can take up to 16 weeks for the dye liquor to fully mature.
How you choose to use the liquor for dying is up to you. I always dilute the liquor so that the fiber is not damaged by the high Ph. Sometimes I do a long cold dyeing process and sometimes I heat the dye bath. I always heat it very slowly and don't go above 82C.
Lichen dyes produced in this way are sensitive to light, so be sure and store your dyed fiber in a dark place.
On my lichen hunt I also stumbled upon some larger bracket fungi called Pellinus tuberculosus.
 |
| Old Pellinus Tuberculosus - not good for dyeing |
 |
Younger specimens of Pellinus tuberculosus
|
These can be found on the dead wood of most fruit trees in my area. They seem to prefer the wild plum wood. They should make a nice golden color.


